
70 자바스크립트 인터뷰 질문 - 1부(번역)
70 JavaScript Interview Questions
javascript, interview, translation
출처
70 JavaScript Interview Questions
시작하며
글이 긴 관계로 4부로 나눠서 진행하며 1부는 1-17번 질문, 2부는 18-36번, 3부는 37-54번, 4부는 55-70번 질문으로 구성되어 있다.
Hi Guys Good Day and a Happy New Year 🎆🎆🎆!
이 글은 긴 내용이므로 한두 시간 동안 나와 함께하시길 바랍니다. 모든 질문에 대한 답변에는 질문 목록으로 돌아가는 화살표 ↑ 링크가 있어서 스크롤 하는 시간을 낭비하지 않아도 됩니다.
질문
- 1. undefined 와 null 은 무엇이 다른가?
- 2. && 연산자는 무엇을 하는가?
- 3. || 연산자는 무엇을 하는가?
- 4. string을 number로 변환하는 가장 빠른 방법은 + 또는 단항 더하기 연산자를 사용하는 것인가?
- 5. DOM 이란 무엇인가?
- 6. Event Propagation란 무엇인가?
- 7. Event Bubbling이란 무엇인가?
- 8. Event Capturing이란 무엇인가?
- 9. event.preventDefault()와 event.stopPropagation() 메서드의 차이점은 무엇인가?
- 10. event.preventDefault() 메서드가 element에 사용되었는지 어떻게 확인하는가?
- 11. 이 코드에서 obj.someprop.x가 에러 발생하는 이유는 무엇인가?
- 12. event.target 이란 무엇인가?
- 13. event.currentTarget 이란 무엇인가?
- 14. == 와 === 의 차이는 무엇인가?
- 15. 자바스크립트에서 비슷한 두 객체를 비교할때 false를 리턴하는 이유는 무엇인가?
- 16. !! 연산자는 무엇을 하는가?
- 17. 한 줄에 여러 표현식을 평가하는 방법은 무엇인가?
1. undefined와 null은 무엇이 다른가?
↑
undefined와 null의 차이점을 이해하기 전에 이들의 유사점을 이해해야 합니다.
- 이들은 JavaScript의 7가지 원시 타입에 속합니다.
let primitiveTypes = ['string','number','null','undefined','boolean','symbol', 'bigint'];- 이것은 falsy 값입니다.
Boolean(value)또는!!value를 사용해서 boolean로 변환할 때 false로 평가된 값입니다.
console.log(!!null); //logs false
console.log(!!undefined); //logs false

console.log(Boolean(null)); //logs false
console.log(Boolean(undefined)); //logs false
Ok, 차이점에 관해 얘기해봅시다.
undefined는 특정 값이 할당되지 않은 변수의 기본값입니다. 또는 명시적인 리턴 값이 없는 함수 예를들어console.log(1). 또는 객체에 존재하지 않는 속성. 자바스크립트 엔진은 이를 위해undefined값을 할당합니다.
let _thisIsUndefined;
const doNothing = () => {};
const someObj = {
  a : "ay",
  b : "bee",
  c : "si"
};

console.log(_thisIsUndefined); //logs undefined
console.log(doNothing()); //logs undefined
console.log(someObj["d"]); //logs undefinednull은 **“값을 나타내지 않는 값”**입니다.null은 변수에 명시적으로 정의된 값입니다. 이 예제에서는fs.readFile메서드가 에러를 던지지 않으면null값을 얻습니다.
fs.readFile('path/to/file', (e,data) => {
  console.log(e); // 에러가 없을 때 로그 null
  if (e) {
    console.log(e);
  }
  console.log(data);
});null과 undefined를 비교할 때 ==를 사용하면 true를, ===을 사용하면 false를 얻습니다. 여기서 확인 할 수 있습니다.
console.log(null == undefined); // logs true
console.log(null === undefined); // logs false
2. && 연산자는 무엇을 하는가?
↑
&& 또는 논리 AND 연산자는 피연산자에서 첫 번째 falsy 표현식을 찾아서 리턴하며, falsy 표현식을 찾지 못하면 마지막 표현식을 리턴합니다.
불필요한 작업을 방지하기 위해 단락(short-circuiting)을 사용합니다. 저는 저의 프로젝트 중 하나에서 데이터베이스 연결을 닫을 때 이것을 catch 블록에서 사용했습니다.
console.log(false && 1 && []); //logs false
console.log(" " && true && 5); //logs 5
if 문 사용.
const router: Router = Router();

router.get('/endpoint', (req: Request, res: Response) => {
  let conMobile: PoolConnection;
  try {
      //do some db operations
  } catch (e) {
    if (conMobile) {
      conMobile.release();
    }
  }
});
&& 연산자 사용.
const router: Router = Router();

router.get('/endpoint', (req: Request, res: Response) => {
  let conMobile: PoolConnection;
  try {
     //do some db operations
  } catch (e) {
    conMobile && conMobile.release()
  }
});
3. || 연산자는 무엇을 하는가?
↑
|| 또는 논리 OR 연산자는 피연산자에서 첫 번째 truthy 표현식을 찾아 리턴합니다. 이것 또한 불필요한 작업을 방지하기 위해 단락(short-circuiting)을 사용합니다.
ES6 Default function parameters가 지원되기 전에 함수 안에서 기본 매개 변수 값 초기화를 위해 사용되었습니다.
console.log(null || 1 || undefined); //logs 1

function logName(name) {
  var n = name || "Mark";
  console.log(n);
}

logName(); //logs "Mark"
4. string을 number로 변환하는 가장 빠른 방법은 + 또는 단항 더하기 연산자를 사용하는 것인가?
↑
MDN 문서에 따르면 + 는 이미 number일 경우 값에 대한 작업을 수행하지 않기 때문에 string을 number로 변환하는 가장 빠른 방법입니다.
5. DOM 이란 무엇인가?
↑ DOM은 Document Object Model의 약자로 HTML 및 XML 문서를 위한 인터페이스 (API)입니다. 브라우저가 HTML 문서를 처음 읽을 때 (구문 분석할 때) HTML 문서를 기반으로 하는 큰 오브젝트를 만드는데 이것이 DOM입니다. HTML 문서에서 모델링 된 트리와 유사한 구조입니다. DOM은 DOM 구조 또는 특정 Elements 또는 Nodes를 상호 작용하고 수정하는 데 사용됩니다.
이와 같은 HTML 구조로 되어 있다고 상상해보십시오.
<!DOCTYPE html>
<html lang="en">

<head>
   <meta charset="UTF-8">
   <meta name="viewport" content="width=device-width, initial-scale=1.0">
   <meta http-equiv="X-UA-Compatible" content="ie=edge">
   <title>Document Object Model</title>
</head>

<body>
   <div>
      <p>
         <span></span>
      </p>
      <label></label>
      <input>
   </div>
</body>

</html>DOM은 다음과 같을 것입니다.

JavaScript의 document 객체는 DOM을 나타냅니다.
이것은 element 내용을 업데이트하기 위해 elements를 선택하는 데 사용할 수 있는 많은 방법을 제공합니다.
6. 이벤트 전파(Event Propagation) 란 무엇인가?
↑
이벤트가 DOM element에서 발생하면 그 이벤트는 하나의 element에서만 발생하지 않습니다.
버블링 단계에서는 이벤트가 버블링되거나 부모, 조부모, 조부모의 부모에게, window에 도달할 때까지 진행되며 반면에 캡처링 단계에서는 이벤트가 window부터 이벤트를 트리거 한 element 또는 event.target까지 아래로 시작됩니다.
이벤트 전파는 3단계를 가집니다.
- Capturing Phase – 이벤트는
window에서 시작하여 대상 element에 도달할 때까지 모든 element를 내려갑니다. - Target Phase – 이벤트가 대상 element에 도달합니다.
- Bubbling Phase – 대상 element에서 이벤트가 발생하고
window에 도달할 때까지 모든 element를 올라갑니다.
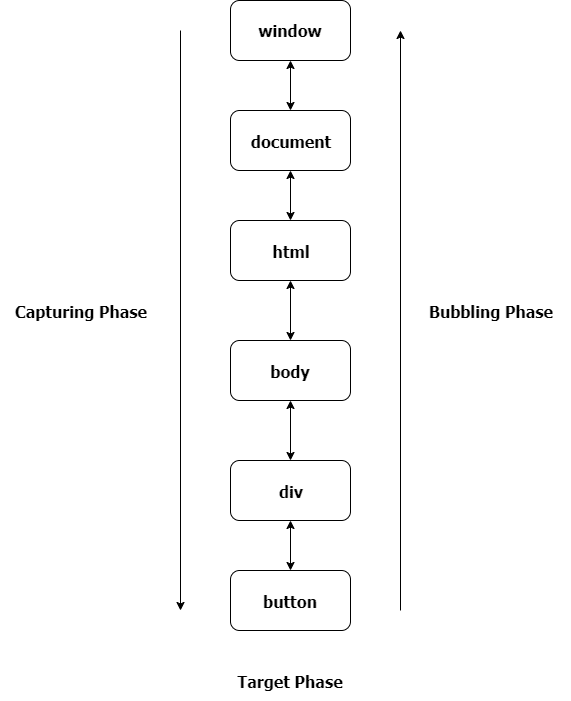
7. 이벤트 버블링(Event Bubbling) 이란 무엇인가?
↑
이벤트가 DOM element에서 발생하면 그 이벤트는 하나의 element에서만 발생하지 않습니다.
버블링 단계에서는 이벤트가 버블링되거나 부모, 조부모, 조부모의 부모에게, window에 도달할 때까지 진행됩니다.
이와 같은 마크업 예제가 있다면.
<div class="grandparent">
 <div class="parent">
   <div class="child">1</div>
 </div>
</div>
그리고 JS 코드.
function addEvent(el, event, callback, isCapture = false) {
 if (!el || !event || !callback || typeof callback !== 'function') return;
 if (typeof el === 'string') {
   el = document.querySelector(el);
 };
 el.addEventListener(event, callback, isCapture);
}

addEvent(document, 'DOMContentLoaded', () => {
 const child = document.querySelector('.child');
 const parent = document.querySelector('.parent');
 const grandparent = document.querySelector('.grandparent');

 addEvent(child, 'click', function (e) {
   console.log('child');
 });

 addEvent(parent, 'click', function (e) {
   console.log('parent');
 });

 addEvent(grandparent, 'click', function (e) {
   console.log('grandparent');
 });

 addEvent(document, 'click', function (e) {
   console.log('document');
 });

 addEvent('html', 'click', function (e) {
   console.log('html');
 });

 addEvent(window, 'click', function (e) {
   console.log('window');
 });
});
addEventListener 메서드에는 기본값이 false인 세 번째 옵션 매개 변수 useCapture가 있으며, 이 이벤트는 버블링 단계에서 발생하고 만약 true인 경우에는 캡쳐링 단계에서 발생합니다.
child element를 클릭하면 콘솔에 child, parent, grandparent, html, document 및 window가 각각 로그로 기록됩니다.
이것이 이벤트 버블링입니다.
8. 이벤트 캡쳐링(Event Capturing) 이란 무엇인가?
↑
이벤트가 DOM element에서 발생하면 그 이벤트는 하나의 element에서만 발생하지 않습니다.
캡처링 단계에서 이벤트는 window에서 이벤트를 트리거 한 element로 시작합니다.
이와 같은 마크업 예제가 있다면.
<div class="grandparent">
 <div class="parent">
   <div class="child">1</div>
 </div>
</div>
그리고 JS 코드.
function addEvent(el, event, callback, isCapture = false) {
 if (!el || !event || !callback || typeof callback !== 'function') return;
 if (typeof el === 'string') {
   el = document.querySelector(el);
 };
 el.addEventListener(event, callback, isCapture);
}

addEvent(document, 'DOMContentLoaded', () => {
 const child = document.querySelector('.child');
 const parent = document.querySelector('.parent');
 const grandparent = document.querySelector('.grandparent');

 addEvent(child, 'click', function (e) {
   console.log('child');
 }, true);

 addEvent(parent, 'click', function (e) {
   console.log('parent');
 }, true);

 addEvent(grandparent, 'click', function (e) {
   console.log('grandparent');
 }, true);

 addEvent(document, 'click', function (e) {
   console.log('document');
 }, true);

 addEvent('html', 'click', function (e) {
   console.log('html');
 }, true);

 addEvent(window, 'click', function (e) {
   console.log('window');
 }, true);
});
addEventListener 메서드에는 기본값이 false인 세 번째 옵션 매개 변수 useCapture가 있으며, 이 이벤트는 버블링 단계에서 발생하고 만약 true인 경우에는 캡쳐링 단계에서 발생합니다.
child element를 클릭하면 콘솔에 window, document, html, grandparent, parent 및 child가 각각 로그로 기록됩니다.
이것이 이벤트 캡쳐링입니다.
9. event.preventDefault()와 event.stopPropagation() 메서드의 차이점은 무엇인가?
↑
event.preventDefault() 메서드는 element의 기본 동작을 방지합니다.
form element에 사용하면 submitting 할 수 없습니다.
anchor element에 사용하면 navigating 할 수 없습니다.
contextmenu에서 사용하면 보여지거나 표시되지 않습니다.
반면에 event.stopPropagation() 메서드는 이벤트 전파를 중지하거나 버블링 또는 캡처링 단계에서 이벤트 발생을 중지합니다.
10. event.preventDefault() 메서드가 element에 사용되었는지 어떻게 확인하는가?
↑
이벤트 객체에서 event.defaultPrevented 속성을 사용할 수 있습니다.
이것은 event.preventDefault()가 특정 element에서 호출되었는지 여부를 나타내는 boolean을 리턴합니다.
11. 이 코드에서 obj.someprop.x가 에러 발생하는 이유는 무엇인가?
const obj = {};
console.log(obj.someprop.x);
↑
분명하게도, 이 에러는 undefined 값을 가진 someprop 속성에서 x 속성에 접근하려는 이유 때문에 발생합니다.
그 자체로 존재하지 않는 객체의 속성을 명심해야 되고 그리고 그것의 프로토 타입은 undefined를 기본값으로 가지며 undefined는 x의 속성이 없습니다.
12. event.target 이란 무엇인가?
↑ 간단히 말해서 event.target은 이벤트가 발생한 element 또는 이벤트를 트리거 한 element입니다.
샘플 HTML 마크업.
<div onclick="clickFunc(event)" style="text-align: center;margin:15px;
border:1px solid red;border-radius:3px;">
 <div style="margin: 25px; border:1px solid royalblue;border-radius:3px;">
   <div style="margin:25px;border:1px solid skyblue;border-radius:3px;">
     <button style="margin:10px">
       Button
     </button>
   </div>
 </div>
</div>
샘플 JavaScript.
function clickFunc(event) {
 console.log(event.target);
}
버튼을 클릭하면 버튼 마크업이 로그로 기록됩니다. 이벤트를 가장 바깥쪽 div에 연결해도 버튼은 항상 기록됩니다.
그래서 event.target이 이벤트를 트리거 한 element라는 결론을 내릴 수 있습니다.
13. event.currentTarget 이란 무엇인가?
↑ event.currentTarget은 이벤트 핸들러를 명시적으로 붙이는 element입니다.
질문 12의 마크업 복사. 샘플 HTML 마크업.
<div onclick="clickFunc(event)" style="text-align: center;margin:15px;
border:1px solid red;border-radius:3px;">
 <div style="margin: 25px; border:1px solid royalblue;border-radius:3px;">
   <div style="margin:25px;border:1px solid skyblue;border-radius:3px;">
     <button style="margin:10px">
       Button
     </button>
   </div>
 </div>
</div>
그리고 JS를 약간 변경.
function clickFunc(event) {
  console.log(event.currentTarget);
}
버튼을 클릭하더라도 가장 바깥 쪽 div 마크업이 로그로 기록됩니다.
이 예제에서 event.currentTarget이 이벤트 핸들러를 붙이는 element라고 결론을 내릴 수 있습니다.
14. == 와 === 의 차이는 무엇인가?
↑
== **(추상적 같음)**와 === **(엄격한 같음)**의 차이점은 == 는 강제변환(coercion) 후 값으로 비교하고 ===는 강제변환 없이 값 및 타입으로 비교한다는 것입니다.
== 에 대해 더 깊이 파봅시다. 그럼 먼저 강제변환에 대해 이야기합시다.
강제변환은 값을 다른 타입으로 변환하는 프로세스입니다.
이 경우와 같이 ==는 암묵적인 강제변환을 수행합니다.
==는 두 값을 비교하기 전에 수행해야 할 몇가지 조건이 있습니다.
x == y 값을 비교해야 한다고 가정해봅시다.
x와y가 같은 타입일 경우===연산자와 비교.x가null이고y가undefined이면true를 리턴.x가undefined이고y가null이면true를 리턴.x타입이number이고y타입이string이면x == toNumber(y)를 리턴.x타입이string이고y타입이number이면toNumber(x) == y를 리턴.x타입이boolean이면toNumber(x) == y를 리턴.y타입이boolean이면x == toNumber(y)를 리턴.x가string,symbol또는number중 하나이고y타입이object이면x == toPrimitive(y)를 리턴.x가object이고y가string,symbol중 하나이면toPrimitive(x) == y를 리턴.false를 리턴.
Note: toPrimitive는 먼저 valueOf 메서드를 사용한 다음 객체의 toString 메서드를 사용하여 해당 객체의 원시값을 가져옵니다.
예를 들어 봅시다.
| x | y | x == y |
|---|---|---|
5 | 5 | true |
1 | '1' | true |
null | undefined | true |
0 | false | true |
'1, 2' | [1, 2] | true |
'[object Object]' | {} | true |
이 예제들은 모두 true를 리턴합니다.
첫 번째 예는 x와 y의 타입과 값이 같으므로 조건 1에 해당합니다.
두 번째 예는 y는 비교하기 전에 number로 변환됨으로 조건 4에 해당합니다.
세 번째 예는 조건 2에 해당합니다.
네 번째 예는 y가 boolean이므로 조건 7로 해당합니다.
다섯 번째 예는 조건 8에 해당합니다.
배열은 1,2를 리턴하는 toString() 메서드를 사용하여 string으로 변환됩니다.
마지막 예는 조건 10에 해당합니다.
객체는 [object Object]를 리턴하는 toString() 메서드를 사용하여 string으로 변환됩니다.
| x | y | x === y |
|---|---|---|
5 | 5 | true |
1 | '1' | false |
null | undefined | false |
0 | false | false |
'1,2' | [1,2] | false |
'[object Object]' | {} | false |
=== 연산자를 사용하면 첫 번째 예제를 제외한 모든 비교는 같은 타입이 아니기 때문에 false를 리턴합니다. 반면에 첫 번째 예제는 동일한 타입과 값을 가지기 때문에 true를 리턴합니다.
15. 자바스크립트에서 비슷한 두 객체를 비교할때 false를 리턴하는 이유는 무엇인가?
↑ 아래의 예가 있다고 가정해봅시다.
let a = { a: 1 };
let b = { a: 1 };
let c = a;

console.log(a === b); // 속성이 같더라도 로그는 false를 기록합니다.
console.log(a === c); // 로그 true hmm
JavaScript는 *객체(objects)*와 *원시값(primitives)*을 다르게 비교합니다.
원시값에서는 **값(value)**별로 비교하지만 객체에서는 참조 또는 변수가 저장된 메모리의 주소로 비교합니다.
그렇기에 첫 번째 console.log 문은false를, 두 번째console.log 문은true를 라턴한 이유입니다.
a와c는 같은 참조를 가지고 있으며 a와b는 동일하지 않습니다.
16. !! 연산자는 무엇을 하는가?
↑
이중 NOT 연산자 또는 !!는 오른쪽의 값을 boolean로 강제합니다. 기본적으로 값을 boolean로 변환하는 멋진 방법입니다.
console.log(!!null); //logs false
console.log(!!undefined); //logs false
console.log(!!''); //logs false
console.log(!!0); //logs false
console.log(!!NaN); //logs false
console.log(!!' '); //logs true
console.log(!!{}); //logs true
console.log(!![]); //logs true
console.log(!!1); //logs true
console.log(!![].length); //logs false
17. 한 줄에 여러 표현식을 평가하는 방법은 무엇인가?
↑
, 또는 쉼표 연산자를 사용하여 한 줄에서 여러 표현식을 평가할 수 있습니다.
왼쪽에서 오른쪽으로 평가하여 오른쪽 또는 마지막 피연산자의 마지막 항목 값을 리턴합니다.
let x = 5;

x = (x++ , x = addFive(x), x *= 2, x -= 5, x += 10);

function addFive(num) {
return num + 5;
}
console.log(x) // 27x의 값을 로그로 기록하면 27이 됩니다.
먼저 x의 값을 6으로 증가시킨 다음 addFive(6) 함수를 호출합니다.
6을 매개 변수로 전달하고 그 결과를 x에 할당하면 x의 새로운 값은 11됩니다.
그런 다음 x의 현재 값을 2로 곱하면 x에 업데이트 된 x의 값은 22가 됩니다.
그 뒤 x의 현재 값에 5를 뺍니다.
그럼 그 결과를 x에 할당하면 업데이트 된 값은 17이 됩니다.
마지막으로 x의 값을 10 증가시킵니다.
그리고 x에 업데이트 된 값을 할당하면 x의 값은 27이 됩니다.